HOW TO START A BLOG IN 2018
THE BEGINNERS GUIDE TO CREATING A BLOG
There’s only one of you in the entire world with your set of unique experiences, skills, and knowledge. What better way to share that than with blogging?
Not only can a blog give you the platform to speak your mind, you can help others and even make money from it! When you’re new to blogging, it helps to get started the right way to avoid frustrating mistakes so you can focus on what matters most: sharing what’s important to you.
Have Your Blog Up & Running In 20 Minutes or Less!
My Free Step-By-Step Guide Will Get Your Blog Up & Running 20 Minutes Or Less
That’s why I created this site to give you guys all the help and support you need to get your blog up and running in just 5 easy steps. Forget combing through long tutorials or trying to learn HTML.
This step-by-step guide will teach you exactly how to start your blog in just 20 minutes. That’s about the time it takes to shower or eat a meal - pretty quick!
By my last count, over 8,576 people have already set up their blogs with this guide. Not all hosting or set-ups are the same though, so make sure you follow each step of this tutorial closely to avoid common mistakes that trip up a lot of new bloggers. Here’s how to set up your blog the quick and easy way.
The Basics:
How to Start a Blog in 5 Easy Steps
I know the decision to start blogging is an important one and it can change your life in a way you never imagined.
4 years ago, I knew almost nothing about blogging and was just a broke college student looking for some extra income to help pay off my bills (and maybe get some beer too, I won’t lie). Excited by the possibility of making money from my dorm room, I went ahead and registered my first domain name.
Then, I got confused about what to do next. I struggled for 18 days clicking around Google for stuff like, “How to create a blog” without grasping anything. There wasn’t information that made any sense to a beginner like me.
I ended up abandoning the domain name for 6 months.
Eventually, I returned to the process of starting a blog after I learned I needed a hosting account. So… I trudged my way through each step after that until I finally figured out how to setup and link my accounts.
Luckily, you don’t have to go through that same struggle. Above everything else, the goal of this page is to help you get started the right way so you don’t get frustrated, lost, or end up giving up altogether. I almost did, and it would’ve been the biggest mistake.
To help you out, I’ve broken down the process into just 5 easy steps:
- Choosing the right blogging platform
- Carefully choosing your hosting
- Registering your hosting and domain name
- Setting up WordPress
- Logging in and adding posts and pages
My step-by-step guide shows you how to set-up your blog the fast and easy way without spending any more than you have to. Let’s get started on the first step!
Step 1:
Choose the Right Platform For Starting a Blog
Before you start thinking about what your blog will look like or what you’ll write about, you need to choose a platform for your blog first. Some of the options include:
- WordPress
- Tumblr
- Blogger
- Medium
- And many more…
While there are a lot of platforms to choose from, one stands out as the most popular mainly for its easy interface: WordPress. Tons of people and even businesses or professionals use WordPress for their websites.
WordPress is by far the fastest growing blogging platform preferred by users and the one I use for almost every website I create. It’s pretty easy to see why, because it’s:
- Free - The cost to use WordPress is free for everyone and includes things like themes and plugins, which I’ll cover more about later.
- Easy To Use - Just about anyone can set-up a WordPress blog, making it convenient and accessible to everyone.
- Safe and Secure - The team at WordPress is constantly updating their software to keep hackers out of your personal information.
- Customizable - There are literally thousands of plugins and attractive themes that are easy to integrate into your WordPress blog. Basically, the sky's the limit and you can let your imagination run wild.
Honestly, if you’re serious about starting a blog - I’d look no farther than WordPress. They offer tons of options so whatever you want your site to do or look like, it’s probably available.
As far as the type of account is concerned though, they do offer a couple options that are pretty important to consider. Let’s have a closer look so you can decide what works best for you.
Create a Free Blog Vs. Self-Hosting — What’s the Difference?
A free blog is the best kind because it doesn’t cost a thing, right? Not so fast.
Even though free sounds like a great option, there’s a reason why so many amateur bloggers and professionals choose to self-host and it’s not because they like paying more than they have to.
Just think, when is the last time you came across a website with an online address like, “[Name].wordpress.com” instead of their own domain like “[Name].com”? The first one looks pretty funny, right?
That means if you’re serious about establishing yourself as a credible blogger or using your blog to make money or for professional purposes, you seriously need to consider self-hosting.
So what exactly are the differences between using a free blog and self-hosting? Here are just a few problems with using a free blog:
- Ownership — When you write on a free blog, none of the content actually belongs to you. The blogging platform can shut down your page at any time for any reason, like if it gets marked for spam or you accidentally violate the rules.
Just imagine all that hard work and passion you pour onto your blog’s pages… gone. Hurts just to think about it, doesn’t it?
- Confusing web address — If you start a blog, of course you’ll want to share it with other people. It’s one thing to link someone to your page, but you want a web address that’s easy for people to remember too.
I promise, people will forget to add the “.wordpress” when trying to find your page and you’ll never know about the traffic you missed.
- Limited control - With a free blog, you’re limited on the amount of storage available so there will be an end to the amount of media you can post. If you include images or videos on your blog, at some point you won’t be able to add anymore without deleting some first.
- Limited
Plugins - Plugins expand the functionality of your webpage just like apps do for a smartphone. Often times, people want to add more functions to their page with a plugin but free blogs limit the ones you can use.
Can you imagine owning a smartphone that couldn’t download apps? It’d be like having a portable landline that couldn’t do anything else. These plugin limits essentially do the same thing to your website, keeping you from doing what you want with your blog.
- Limited Design - Free blog sites on WordPress offer only limited themes. You DO have the option to upgrade to another theme for about $30/year, but that doesn’t address the lack of plugins or storage space. Basically, you can have a pretty looking website that’s limited in all other capacities. Pretty pointless.
- Not Allowed to Advertise - You’re not allowed to do affiliate marketing on free blogs or use it for other types of advertising, greatly reducing your options for ever earning money with your blog.
Even if you’re not starting out trying to earn money with your page, you never know what the future holds. It’s better to be prepared and keep your options open.
Those are just some of the biggest problems you can run into when using a free blog. It’s certainly enough reasons for me to self-host from the beginning every time and I always suggest new bloggers do the same.
But the most important questions is - how much is self-hosting? It’s easier to do and more affordable than you think to self-host. Not only that, it can save you a lot of headache in the long run so you can avoid all the problems I’ve talked about.
What you will pay to setup your blog costs less than a single movie ticket, so it doesn’t exactly break the bank. Here’s a detailed look into how to choose the right hosting for your blog.
Step 2:
How to Choose the Right Hosting When You Create a Blog
In my years of creating numerous blogs, I’ve learned the hard lesson that not all web hosts are equal despite what they claim. I’ll give you the rundown of exactly what you need to look for so you don’t have to deal with the frustration of a bad host. But before we dig into that, you need to pick a domain name.
Your domain name is the web address where people will find your blog. For example, Facebook’s domain name is www.Facebook.com. Your blog’s domain name will be something like www.[name of your blog].com (or .net/.org/whatever you choose).
The name you choose is pretty important since that’s what people first see before even visiting your page. Some tips for choosing a good domain name include:
- Picking something memorable - You want to be able to remember your domain name easily when you’re sharing it with others. But more importantly, you want it to be something your visitors can easily recall.
For example, using “Ultimate Snowboarding Expert” is probably too long and the order of the words is easy to mix-up. But “Ultimate Shredder” is short and easier to commit to memory. Choose a name that is easy for you AND your visitors to remember.
- Making it catchy and descriptive - Your domain name should be enticing and something that captures the interest of your audience, but you also want to communicate what your blog is about too.
For example, a blog about cooking recipes could be named “www.JoansBestRecipes.com”. That’s a good name because immediately, you know it’s about recipes and cooking from a person named Joan.
But a name like “www.JoansFavoriteFoods.com” is vague and can be pretty confusing. Is the blog about Joan’s favorite restaurants? Recipes? Foods to help you stay on a diet? It’s hard to tell.
Once you’ve decided on a domain name, you’re ready to pick website hosting.
Think of web hosting like a home for your domain name where all your content, images, and posts are stored.
Without a web host, you can’t use your domain name. (By the way, domain names typically cost about $15 per year but if you keep following this guide, I’ll tell you how to grab it for FREE.)
In general, web hosting costs about $2-5 a month, which is less than the cost of a meal at any fast food restaurant (and we could all use a little less of that). So let’s get to the point already and look at who you should choose for hosting.
Who’s The Best For Domain Name and Hosting?
Choosing your hosting carefully can determine the success of your blog so it’s an important decision. When it comes to hosting, there are only 3 things you really need to consider:
- Page Speed - refers to the amount of time it takes for your blog’s pages to load. People these days have a short attention span so if it takes your page longer to load, they’ll get bored and click away. But a faster page speed allows your visitors to start engaging with your content immediately.
- Uptime - refers to the time your site is “up” and available for visitors to see and browse. You might think 99.5% of uptime is excellent, but that still leaves over 200 minutes of downtime in a month.
That means every time the site is down, your web visitors will be redirected to a page for broken links. After that happens a few times, they may stop visiting altogether and you definitely don’t want that.
Many of the best hosting options give at least 99.9% of uptime so you should shoot as close to that as possible.
- Customer support - There’s nothing worse than encountering a problem you don’t know how to handle and being unable to find help to figure it out. The best hosting companies offer customer support in a timely manner.
There are literally hundreds of hosting providers available and many of them claim to offer the same things at a similar price so it’s hard to tell them apart. Don’t let yourself be fooled and make sure you choose a host that’s vetted by others and has positive feedback from the blogging community.
My personal favorite for consistent page loads, the best uptime, and stellar customer support is… (drum roll)... HostGator.
It’s one of the best options for beginners and is even recommended by WordPress, which means it’s optimized for WordPress and meets their standards.
Of course, you can pick any web hosting you prefer. Just make sure it’s reliable, fast, and gives you unlimited bandwidth and storage so you’re not limiting what you can do. But here’s why I love HostGator:
- 24/7 customer support
- 99.9% uptime guaranteed
- They offer SSL (https://) to secure your website
- Easy to use
- Unlimited email accounts and websites
- 45 day money-back guarantee
If you’re reading this guide right now, you can use HostGator for 50% off with my link so make sure you’re not spending more than you have to. Personally, I use HostGator with all the sites I create and have always enjoyed a positive experience with them.
The rest of this guide is specific to setting up with HostGator but it should still be similar if you’re using another hosting service. Now, let’s dig into setting up your domain and hosting.
Step 3:
How to Set Up A Domain Name and Hosting For a Blog
By the end of this step, I’ll show you how to setup your domain name with HostGator and you’ll have a fully functioning WordPress blog with the domain name you pick out. Pretty exciting, right?
Let’s get started.
1. Start Your WordPress Blog at HostGator
The first thing you do is visit HostGator and click, “Start my WordPress blog”.
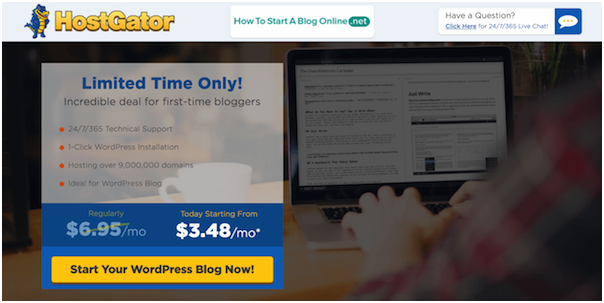
Since HostGator is my go-to source for hosting, I’ve negotiated a special 50% discount for my readers, so make sure you use the link in this article. The discount will be applied automatically (you’re welcome).
2. Enter the Domain Name You Want
On the next page, enter the domain name you want to register and click next. If it’s available, it’s yours to claim. But if it’s not - you’ll have to pick another one.
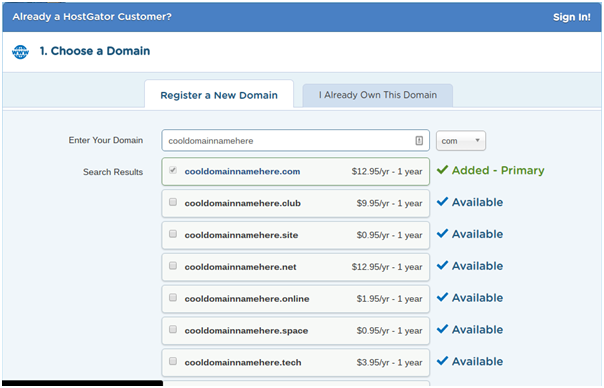
Choosing “.com” as your extension is a smart option, since it’s the one most people use. If it’s already taken, try for “.org” or “.net” to see if they’re free. Avoid crazy extensions like .rocks or .biz as they’re harder to remember and not easily trusted by visitors.
Pro tip: You can always change your domain name later with a 301 redirect if you don’t like it.
3. Choose Your Plan and Enter Billing Info
Next, choose your hosting plan. If it’s your first blog, I suggest HostGator’s basic “hatchling” option since you can always upgrade later if you decide you need more.
Then create a login and security pin that you can easily remember and enter your billing information. Keep the login information written down somewhere in case you forget it.
The final step for this page is to look over the recommended add-ons. This is your chance to save even more money so make SURE to take a look now or you’ll end up paying more later.
At the least, I recommend you choose the HackAlert monitoring to make sure your page and private information stays safe. Use the coupon code htsabo to save 50% off (you’re welcome again) and click validate to make sure you receive the discount.

And finally, click “Check out Now”.
The next page should show that your order has processed.
Congratulations! That’s it, you’re now the proud new owner of your very own blog. It wasn’t so hard, was it?
Next, let’s move onto setting up your blog so you can get started sharing your voice with the world.
Step 4:
Set Up Your WordPress Blog
It might take HostGator a bit to set up your account so wait for the confirmation email before moving onto this next step.
Once your account is registered, it’s time to login to your Cpanel.
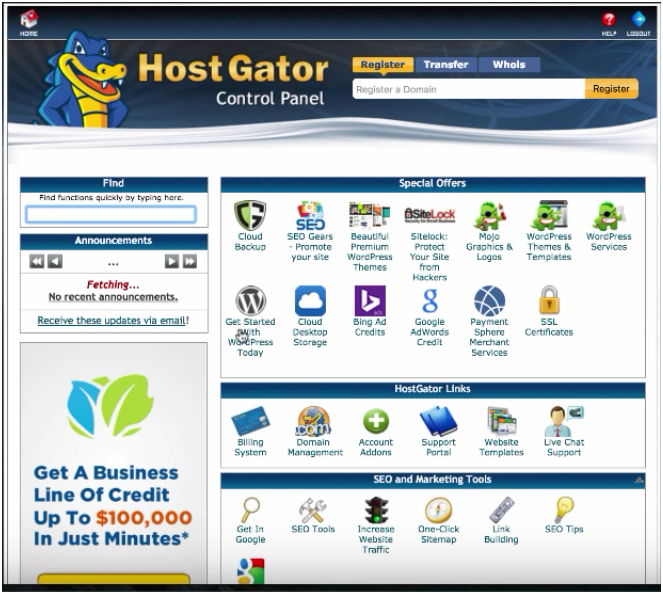
First, open up the confirmation email from HostGator and follow the login instructions.
Then, look for “Get Started with WordPress Today” under the Special Offers section and click it.
Click “Install” and follow the instructions to install WordPress onto your new domain. Make sure you use your correct email address as this is where they’ll send your WordPress login credentials.
Once the installer has finished loading, you’ve successfully set up hosting for your blog domain. Great job!
Step 5:
Login and Start Blogging
Now that the installation process is complete, you’ll receive another confirmation email from HostGator with your WordPress login information.
Open a new tab in your browser and visit “http://[your blog’s name].com/wp-admin” (replace [your blog’s name] with the actual name of your blog).
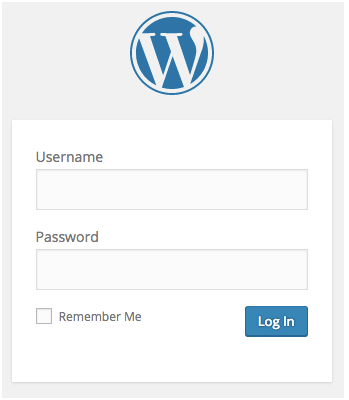
Login with the credentials from the confirmation email.
The first view on your login page is your dashboard. On the left is a list of menus. When you’re ready to start your first post, hover the mouse over “Posts”.
Under the sub-menu that pops up, click “Add new”.

Include an appropriate title for the post and add some content, then hit publish.

To see what the post looks like to your readers, click “View Post” on the next page.
...And that’s it.
A huge congratulations for completing the entire process of starting a WordPress blog and making your first post all on your own!
Feels pretty good, doesn’t it?
If you liked this step-by-step guide for setting up your blog, make sure you check out my FREE blogging guide that includes:
- Directions for changing to a WordPress theme you love
- Simple tutorials on how to edit and publish posts or pages
- Adding images, links, and formatting
- Tips and tricks to make your blog more search engine friendly
Get access now to my totally free guide to customize your blog the right way, starting now. It doesn’t cost a thing, but it can offer the guidance you need to optimize your posts and make them even better.
If you’ve read this far but haven’t actually gotten hosting for your blog yet, here’s a quick recap of everything we’ve gone over.
Start Your Blog The Quick and Easy Way
In the Time it Takes to Eat Lunch
Starting a blog doesn’t take much time and offers a lot of rewarding benefits. In fact, if you follow my step-by-step instructions, you should have your blog up and running in just 20 minutes!
Blogging is a great way for you to connect with an audience, help others, and even make some extra money!
To begin setting up your blog, start by signing up with HostGator for hosting. I personally use HostGator for all my websites because it’s fast, reliable, and they have great customer service. Remember that I’ve negotiated a special price for my readers so make sure you use my link.
Then use the discount code “htsabo” to get a bonus 50% off the hosting add-ons.

Once you’ve finished installing and setting up your blog, you’re ready to start posting. My free blogging guide gives you insight and guidance to set up your blog the right way including:
- Directions for upgrading WordPress themes
- Tutorials on editing and publishing posts
- Tips for adding images, links, and formatting
- Tricks for optimizing your blog for search engines
Overall, blogging is a lot of fun and connecting with an audience is a rewarding and enriching experience. Make sure you’re doing everything you can to attract new readers and making it easy for search engines to understand your content.
Still have things on your mind? Here are the answers to some of the most frequently asked questions I get.
Should You Start a Blog?
Finding Your Passion and Sharing it With Like-Minded People
Hobbies and leisure activities are a great way to figure out what you like or don’t like. If blogging has been on your mind for awhile or you just want to try it, there’s no better time than now to see if it suits you.
Below, I cover some of the common problems people run into when they just start out with a new blog.
What Are the Biggest Reasons to Start Blogging?
For many people, blogging is a fun, enriching activity where they can learn more about themselves and the world, share information with others, and get positive feedback.
When I first started my blog, I knew I wanted to reach people who were interested in the same things as I was. Once I established a community of like-minded people, the experience got even better.
Here are some of the biggest reasons people start blogging:

How to Make a Blog Stand Out With Custom Design Elements
Once you start a blog, you’ll want the look of the pages to reflect your personality. A great way to communicate what you want is to make your page look the way you want it to. You can customize your website with different themes and plugins.
WordPress offers tons of free themes that look professional and attractive. A lot of free themes offer excellent functionality, sometimes even better than a theme you might pay for.
However, paid themes have benefits too by offering compatibility with more plugins so you can expand the functions of your site. The cost for themes ranges anywhere from $10-200 with an average cost of $59 per year.
My free blogging guide helps you figure out which themes are best and tells you how to avoid installing themes that are produced from unreliable sources.
How Do You Get Visitors When You First Start a Blog?
When you first start your blog, your only readers will likely be people you know like close friends and family. Part of the excitement of starting a blog is to have more people reading what you have to say.
As you begin to write more, others in the blogging community will start finding you. One great way to get more traffic to your page is to visit other blogs and engage with their content. You can do this by leaving comments or sharing their posts.
Just as you can track activity on your own blog, others will see when you visit theirs and are likely to return the favor.
Another way to get more visitors is to promote your blog on social media. Find groups or online forums with similar interests and make a post that includes a link to your blog. You can even start your own Facebook group so others are easily updated whenever you make a new post.
Make sure to include an About Me or Contact Me page on your site so readers can learn more about you. The more they know, they more likely they are to get invested in your blog.
Also remember to put “share” buttons on your posts so people who find your articles interesting or engaging can easily share it on their own social media profiles.
All of these are simple ways to get more visitors to your blog. If you want to learn more, here’s an article I wrote on 101 actionable tips for getting traffic to your blog.
How Do I Make My Posts Visually Appealing?
If your website is boring, people won’t spend a lot of time looking at it. One great way to keep readers focused and engaged with your page is to include visuals.
Not only do images help break up text, they keep readers engaged with your content long enough to make a stronger connection. This increases the likelihood they’ll come back for more.
Make sure you use high-quality images like stock photos. If you prefer images you take yourself, try to use a camera with higher pixels to keep your images clear.
But visual attractiveness is not just about images. Don’t be afraid to experiment with your text and use headers, fonts, or italics to communicate. Often, underlining one word or using bold for one sentence can drive your most important points home.
New bloggers often struggle with writing on their site since their experience with writing was likely with term papers or through instant messaging. A blog is neither of those!
Break up large blocks of text with spaces so your posts are easier to read. Include lists, which are easier to digest as well.
What Should I Write About?
When you think about the number of blogs out there, the topics cover just about everything including:
- Travel
- Cooking
- Fitness
- Dating
- Fashion
- Photography
- Marketing
- Politics
- Religion
The list goes on. And within each of these niches, things get even more specific. For instance, travel blogs can be broken down into things like:
- Travel hacking — how to earn rewards
- Staying on a budget
- Resorts
- Eating
- Shopping
- Visiting spots off the beaten track
- Etc
So what kind of blog do you want to create? It’s helpful to start off thinking about what you’re passionate about. What can you talk about for hours at a time without running out of things to say?
When I finally launched my first blog, I was really passionate about writing and publishing. So I made that my niche and was able to connect with a lot of nice people who taught me things. I even made money from my blog and was fulfilled.
You can experience the same thing. Don’t worry about figuring out the specific details of your blog topic right away. Your specialty ends up showing itself over time as you make more posts. As long as you have a general idea of what you want to write about, you’re ready to start.
How Do I Earn Money From My Blog?
If earning money from your blog is part of your plan, consider the resources you have and how easy it will be to attract advertisers to your niche. Is there a lot of competition in this space already?
Choosing a niche allows you to reach potential customers and establish yourself as an authority on the topic. When your posts are set around the same theme, you’ll attract people who are interested in what you have to say.
If they like your recommendations, they’ll come back again and again and rely on you as a source of valuable information.
There are also advantages to choosing a niche if you want to start blogging for a small business. Focus your attention on your strengths and gain market appeal for your products.
You want to accurately describe the products and services you are offering while finding new ways to step away from your competition.
Most of the time, people that are shopping online already know what it is they are looking to buy. Having a niche helps you describe what you are offering and makes it easier for the average internet user to find your particular website.
Can You Help Me?
If you get stuck while creating your blog or want more information on web host providers or any of the step-by-step instructions, feel free to contact me here. I’m glad to offer some free guidance because I know what a hard time I had when I first started.
If you liked my guide, feel free to share it with the buttons below to help others who might be struggling with starting a blog.
And don’t forget to get my free blogging guide to help you get started with all the basics.
